Crafting is a rewarding and therapeutic hobby that allows you to express your creativity, reduce stress, and make beautiful or functional items for your home or as gifts. Whether you’re a beginner just getting started or an experienced crafter looking to try something new, there are countless DIY projects to explore. The best part? You don’t need to spend a fortune on supplies or be an expert to create something amazing. With the right tools, techniques, and a bit of imagination, you can create personalized, beautiful crafts that you’ll be proud of. In this ultimate DIY crafting guide, we’ll break down crafting ideas by skill level, so whether you’re a complete novice or a seasoned crafter, there’s something for everyone. Let’s dive into the exciting world of DIY crafting!
For Beginners: Simple and Fun Crafts to Get Started
Why It’s Fun:
If you’re just starting out with crafting, the goal is to build confidence while having fun. Simple projects with few materials and easy-to-follow steps are the perfect introduction to the world of DIY crafts.
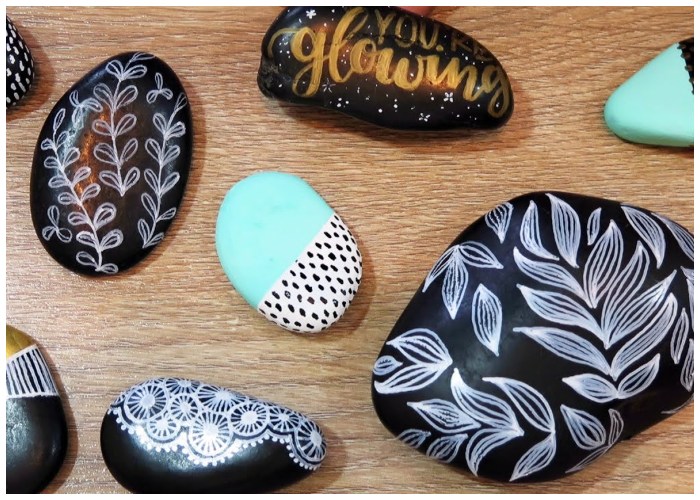
1. Painted Rocks
What You’ll Need:
- Smooth, clean rocks
- Acrylic paint (variety of colors)
- Paintbrushes
- Sealant (optional)
How to Make It:
- Start by selecting smooth rocks from your yard or a local park.
- Clean the rocks and let them dry.
- Use acrylic paint to create fun designs, patterns, or even personalized messages.
- Once dry, seal with a protective coat if you plan on keeping them outside.
Why You’ll Love It:
This beginner craft is inexpensive, easy, and can be done anywhere. Plus, you can use your painted rocks to decorate your garden or leave them around for others to find, spreading joy!
2. Handmade Greeting Cards
What You’ll Need:
- Blank cards or cardstock
- Markers, stamps, or paint
- Stickers, ribbons, or embellishments
How to Make It:
- Start with blank cards or folded cardstock.
- Use markers or paint to add your design. You can draw, write a personal message, or use rubber stamps for intricate patterns.
- Add decorative elements like stickers, glitter, or ribbons to enhance your card.
Why You’ll Love It:
Crafting personalized cards is a fun way to celebrate special occasions and show your love for others. These handmade cards are sure to stand out and make any recipient feel appreciated.
3. Paper Flowers
What You’ll Need:
- Colored paper (tissue paper, cardstock, or patterned paper)
- Scissors
- Glue stick or hot glue gun
- Green paper (for leaves, optional)
How to Make It:
- Cut your paper into flower petal shapes (simple oval or rounded petal shapes work well).
- Layer several petals on top of one another, gluing them in place as you go.
- Shape the petals by gently curling them or folding the edges to create dimension.
- Add green leaves (optional) and arrange the flowers in a vase or on a greeting card.
Why You’ll Love It:
Paper flowers are a quick and inexpensive way to brighten up your home or create a heartfelt gift. Plus, they last forever, unlike real flowers!
For Intermediate Crafters: Projects to Challenge Your Creativity
Why It’s Fun:
Once you’ve gained some experience with simple crafts, you may want to challenge yourself with more intricate projects. These projects require a bit more time and skill, but they’re still achievable and offer a great opportunity to develop new techniques.
4. Customized Mugs
What You’ll Need:
- Plain ceramic mugs
- Oil-based Sharpie markers or ceramic paint pens
- Oven (for setting the design)
How to Make It:
- Draw or write your design on the ceramic mug using oil-based markers or paint pens.
- Allow the design to dry for a few hours.
- Set the design by baking the mug in the oven at 350°F for 30 minutes.
- Let it cool completely before using.
Why You’ll Love It:
Custom mugs make fantastic personalized gifts or decor pieces. This project allows you to create functional, unique items with minimal effort, and the design can be as simple or intricate as you like.
5. Knitted Scarves
What You’ll Need:
- Yarn (choose a soft, medium-weight yarn for beginners)
- Knitting needles
- Scissors
- Tapestry needle
How to Make It:
- Start by learning the basic knit stitch. There are plenty of tutorials available online to get you started.
- Choose a simple pattern (like a basic garter stitch or ribbed pattern) and knit until your scarf reaches your desired length.
- Finish off by binding off and weaving in any loose ends with a tapestry needle.
Why You’ll Love It:
Knitting is a relaxing and rewarding craft. Making your own scarves allows you to create cozy, functional accessories while honing your knitting skills.
6. Wooden Sign with a Quote
What You’ll Need:
- Wooden board (cut to your desired size)
- Stencils or vinyl lettering (for easy lettering application)
- Paint (acrylic or chalk paint)
- Paintbrush
How to Make It:
- Sand down the wooden board to create a smooth surface.
- Use stencils or vinyl lettering to write your favorite quote or saying.
- Paint over the stencils and let the design dry. If you want a rustic look, lightly sand the edges.
- Display your sign in your living room, kitchen, or entryway.
Why You’ll Love It:
A custom wooden sign adds character and personality to any room. Whether you use a motivational quote, a family saying, or a funny phrase, your sign will become a unique focal point in your home.
For Advanced Crafters: Projects to Show Off Your Skills
Why It’s Fun:
For those with crafting experience, advanced DIY projects are a fantastic way to push your creative limits and create truly impressive works of art. These projects require a bit more skill and patience, but they’re incredibly rewarding.
7. Upcycled Furniture
What You’ll Need:
- Old or worn-out furniture
- Sandpaper, paint, or stain
- New hardware (optional)
- Fabric (if reupholstering)
How to Make It:
- Choose a piece of furniture you’d like to upcycle, such as an old dresser or chair.
- Sand down the piece to remove old paint or finishes.
- Apply a fresh coat of paint or stain, and replace hardware if needed (new knobs or handles can completely change the look of a piece).
- If reupholstering, remove the old fabric and staple on the new fabric of your choice.
Why You’ll Love It:
Upcycling furniture not only gives new life to old pieces but also allows you to customize your furniture to fit your personal style. It’s a challenging but rewarding project that can transform your home.
8. Macramé Wall Hanging
What You’ll Need:
- Macramé cord or cotton rope
- Wooden dowel or branch
- Scissors
How to Make It:
- Cut your macramé cord into several equal lengths.
- Learn basic knots such as square knots, lark’s head knots, and half-hitch knots to create your pattern.
- Attach the cords to a wooden dowel or branch, and arrange the knots to create a beautiful design.
- Trim the ends to your desired length and hang it on your wall.
Why You’ll Love It:
Macramé wall hangings are perfect for adding a boho-chic vibe to your home. The knots and patterns are soothing to create and can bring a touch of texture and elegance to any room.
9. Upholstered Headboard
What You’ll Need:
- Wooden board (cut to your bed’s width)
- Foam padding
- Upholstery fabric
- Staple gun
- Scissors
How to Make It:
- Start by cutting the wooden board to the size of your bed’s width.
- Cut foam padding to fit over the board and staple it into place.
- Lay your fabric over the foam and board, pulling it tight and stapling it to the back of the board.
- Attach the headboard to your bed frame or mount it to the wall for a luxurious, custom touch.
Why You’ll Love It:
An upholstered headboard adds a stylish, polished look to your bedroom, and making one yourself allows you to customize the fabric and design to your liking.